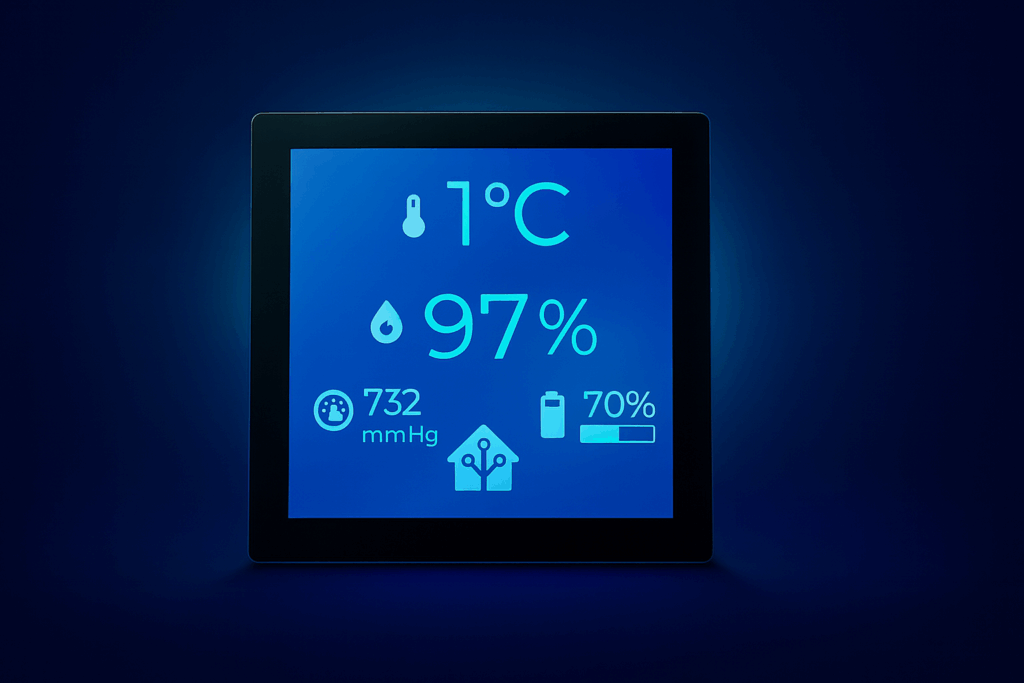
This project turns an ESP32-S3 with a 480×480 RGB (ESP32-4848S040С) display and capacitive touchscreen into a fully touch‑controlled Home Assistant dashboard. It shows outdoor temperature, humidity, pressure, battery level, and has a dedicated settings page where you can change:
- 💡 Screen brightness
- 🎨 Text color (via RGB sliders or HEX value)
- 🟦 Icon color (via RGB sliders or HEX value)
All of that is done entirely in ESPHome, using LVGL for the UI, with bi‑directional sync to Home Assistant.
In this post I’ll walk through:
- 🔍 What this configuration does
- 🔁 How the data flows between Home Assistant, ESPHome, and LVGL
- 🧠 Key implementation details and design decisions you can reuse in your own projects
High‑Level Overview 🧭
At a high level, this ESPHome config does three big things:
- Displays live sensor data from Home Assistant 📡
- 🌡️ Temperature, 💧 humidity, 🌬️ pressure, and 🔋 battery level from HA entities.
- UI is drawn with LVGL on an ST7701S 480×480 display.
- Provides a touch‑driven settings page ✋
- Swipe gesture or tap on the Home Assistant icon to open settings.
- Brightness control via slider (directly drives the backlight).
- Text and icon colors configured with RGB sliders and HEX input.
- Keeps everything in sync and persistent 💾
- Colors are stored in
globalsand survive reboots. - HEX text fields in Home Assistant update the device colors.
- Sliders on the device update the HEX text fields back in HA.
- Colors are stored in

Hardware & Core Setup 🛠️
The YAML starts with a standard ESPHome + ESP32‑S3 setup:
esp32withvariant: esp32s3andframework: esp-idf- Encrypted
apiandotawith secrets for keys and passwords wifiplus a fallback APlogger,web_server,captive_portal, and adebugblock
There’s also a debug text sensor:
text_sensor:
  - platform: debug
    device:
      name: "Device Info"
    reset_reason:
      name: "Reset Reason"
This is handy to see why the controller restarted (power loss, watchdog, firmware update, etc.) directly from Home Assistant.
Display & Touch 🖥️👆
The display is driven by the st7701s platform:
- Resolution: 480×480
- RGB interface (data pins for red, green, blue)
- Pixel clock, porch, and sync parameters tuned for this panel
- SPI used for command channel (
spi_id: spihwd)
display:
  - platform: st7701s
    id: tft_display
    dimensions:
      width: 480
      height: 480
    ...
The capacitive touchscreen uses the GT911 driver on I²C:
touchscreen:
  - platform: gt911
    id: tft_touch
    display: tft_display
On top of that, we attach custom swipe logic (more on that later) to implement page switching.

Backlight Control: Treating the Display as a Light 💡
The backlight is driven by PWM on GPIO38 and exposed as a standard ESPHome light:
output:
  - platform: ledc
    pin: GPIO38
    id: backlight_pwm
    frequency: 1000 Hz

light:
  - platform: monochromatic
    output: backlight_pwm
    name: "Display Backlight"
    id: back_light
    internal: false
    restore_mode: RESTORE_DEFAULT_ON
    gamma_correct: 1.0
Key points:
restore_mode: RESTORE_DEFAULT_ON– after reboot, the display turns on and tries to restore the last brightness.internal: false– backlight is visible in Home Assistant as a regular light entity.gamma_correct: 1.0– disable extra gamma; the panel already has its own brightness curve.
Keeping the Brightness Slider in Sync 🔄
To keep the on‑device LVGL slider and HA entity in sync, there is a template sensor:
sensor:
  - platform: template
    id: current_brightness_variable
    name: "Current Brightness"
    unit_of_measurement: "%"
    update_interval: 2s
    lambda: |-
      return id(back_light).current_values.get_brightness() * 100.0f;
    on_value:
      - lvgl.slider.update:
          id: brightness_slider
          value: !lambda 'return x;'
      - lvgl.label.update:
          id: brightness_value_label
          text:
            format: "%.0f%%"
            args: [ x ]
            if_nan: "--%"
Flow:
- 🔍 The template sensor reads the actual light brightness (0.0–1.0) and converts it to percent.
- ⏱️ Every 2 seconds, it pushes the value into the LVGL slider and label.
- 🏠 If HA changes the brightness, the slider moves automatically and the value text updates.
The slider itself also writes back to the light:
on_change:
  then:
    - lambda: |-
        // Disable swipe detection while brightness slider is being dragged
        id(swipe_locked) = true;
        id(swipe_in_progress) = false;
    - script.execute: settings_idle_timer
    - lambda: |-
        float v = x / 100.0f;
        if (v < 0.15f) {
          v = 0.15f;  // Avoid fully turning off backlight
        }
        auto call = id(back_light).turn_on();
        call.set_brightness(v);
        call.perform();
    - lvgl.label.update:
        id: brightness_value_label
        text:
          format: "%.0f%%"
          args: [ x ]
          if_nan: "??%"
Design decisions here:
- 🚫 Never go completely dark: brightness is clamped to at least 15%, so you can’t “lose” the screen.
- 🧭 Touch vs. swipe: changing brightness temporarily disables swipe recognition so vertical slider movement is not mistaken for a horizontal gesture.
Fetching Sensor Data from Home Assistant 🌡️💧🌬️🔋
The main page shows four key values:
- 🌡️ Temperature (
sensor.outdoor_sensor_temperature) - 💧 Humidity (
sensor.outdoor_sensor_humidity) - 🌬️ Pressure (
sensor.outdoor_pressure_mmhg) - 🔋 Battery level (
sensor.outdoor_sensor_battery)
Each one is a sensor with platform homeassistant. Example:
sensor:
  - platform: homeassistant
    id: temperature
    unit_of_measurement: "°C"
    entity_id: sensor.outdoor_sensor_temperature
    on_value:
      - lvgl.label.update:
          id: temperature_value
          text:
            format: "%.0f"
            args: [ x ]
            if_nan: "??"
When the HA entity updates, ESPHome calls on_value, and we update the LVGL label with formatted text. The pressure widget uses "???" when the value is not available; battery prints "??%".
For the battery, there’s also a progress bar:
on_value:
  - lvgl.label.update:
      id: battery_value
      text:
        format: "%.0f%%"
        args: [ x ]
        if_nan: "??%"
  - lvgl.bar.update:
      id: battery_bar
      value: !lambda |-
        if (isnan(x)) return 0;
        float v = x;
        if (v < 0.0f) v = 0.0f;
        if (v > 100.0f) v = 100.0f;
        return (int) v;
The bar is styled to look like a battery frame with a filled inner bar, and its colors are also tied to the text color engine (see next section).
Color Engine: Globals + HEX + Sliders 🎨
One of the most interesting parts of this configuration is the dual color system:
- One color for text
- Another color for icons
Both are stored as three globals (R, G, B) with restore_value: true so they survive reboot:
globals:
  - id: text_color_r_glob
    type: int
    restore_value: true
    initial_value: '255'
  - id: text_color_g_glob
    type: int
    restore_value: true
    initial_value: '255'
  - id: text_color_b_glob
    type: int
    restore_value: true
    initial_value: '255'

  - id: icon_color_r_glob
    type: int
    restore_value: true
    initial_value: '255'
  - id: icon_color_g_glob
    type: int
    restore_value: true
    initial_value: '255'
  - id: icon_color_b_glob
    type: int
    restore_value: true
    initial_value: '255'
These six integers are the single source of truth for colors. Everything else (HEX strings, sliders, LVGL styles) is derived from them.
Bidirectional HEX Text Fields 🔁
To control colors from Home Assistant, there are two text entities:
Text Color HexIcon Color Hex
They are exposed as text: with platform: template:
text:
  - platform: template
    name: "Text Color Hex"
    id: text_color_hex
    optimistic: true
    mode: text
    max_length: 7
    on_value:
      then:
        - lambda: |-
          std::string s = x;
          // trim whitespace, strip optional '#', expect 6 hex chars
          ...
          if (s.size() == 6) {
            unsigned int r, g, b;
            if (sscanf(s.c_str(), "%02x%02x%02x", &r, &g, &b) == 3) {
              id(text_color_r_glob) = (int) r;
              id(text_color_g_glob) = (int) g;
              id(text_color_b_glob) = (int) b;
              ESP_LOGI("text_color_hex", "Parsed HEX %s -> R=%u G=%u B=%u", s.c_str(), r, g, b);
              id(apply_text_color).execute();
              id(update_color_ui).execute();
            }
          }
Same logic exists for icon_color_hex.
Flow:
- 🎯 You type
#FFAA00(orFFAA00) in Home Assistant. - ⚙️ ESPHome parses the string, normalizes it, and converts HEX → RGB.
- 🎚️ The global variables are updated.
- 🎨 The scripts
apply_text_color/apply_icon_colorandupdate_*_uiare executed.
Applying Color to LVGL Widgets 🧩
The apply_text_color script is responsible for repainting all relevant UI elements:
script:
  - id: apply_text_color
    then:
      - lvgl.label.update:
          id:
            - temperature_value
            - temperature_unit
            - humidity_value
            - humidity_unit
            - pressure_value
            - pressure_unit
            - battery_value
          text_color: !lambda |-
            int r = id(text_color_r_glob);
            int g = id(text_color_g_glob);
            int b = id(text_color_b_glob);
            ...
            uint32_t rgb = ((uint32_t)r << 16) | ((uint32_t)g << 8) | (uint32_t)b;
            return lv_color_hex(rgb);
It also updates:
- 🟥 The frame and indicator color of the battery bar.
- 🟦 The indicator and knob of the brightness slider.
apply_icon_color does the same for image widgets:
- id: apply_icon_color
  then:
    - lvgl.image.update:
        id:
          - temperature_icon_widget
          - humidity_icon_widget
          - pressure_icon_widget
          - battery_icon_widget
          - ha_icon_widget
        image_recolor: !lambda |-
          int r = id(icon_color_r_glob);
          int g = id(icon_color_g_glob);
          int b = id(icon_color_b_glob);
          ...
          uint32_t rgb = ((uint32_t)r << 16) | ((uint32_t)g << 8) | (uint32_t)b;
          return lv_color_hex(rgb);
So changing the icon color instantly recolors all icons via LVGL’s image_recolor feature.
Sliders + Preview + HEX Label on Settings Page 🎛️
On the settings page there are RGB sliders plus a preview rectangle and a HEX label for both text and icon colors.
For text color:
- Sliders:
color_r_slider,color_g_slider,color_b_slider - Labels:
color_r_value_label,color_g_value_label,color_b_value_label - HEX label:
color_hex_label - Preview rectangle:
color_preview
When you drag a slider, it:
- 🔄 Updates the corresponding global channel (
text_color_r_glob, etc.). - 🎨 Runs
apply_text_colorto recolor the UI. - 🧹 Runs
update_color_uito refresh all labels, sliders, and preview. - 📨 Updates the
text_color_hextext entity so Home Assistant sees the new HEX.
Example for R:
on_change:
  then:
    - lambda: |-
        id(swipe_locked) = true;
        id(swipe_in_progress) = false;
    - script.execute: settings_idle_timer
    - lambda: |-
        id(text_color_r_glob) = (int) x;
    - script.execute: apply_text_color
    - script.execute: update_color_ui
    - text.set:
        id: text_color_hex
        value: !lambda |-
          int r = id(text_color_r_glob);
          int g = id(text_color_g_glob);
          int b = id(text_color_b_glob);
          ...
          char buf[8];
          sprintf(buf, "%02X%02X%02X", r, g, b);
          return std::string(buf);
So the color system is completely bi‑directional:
- Home Assistant → HEX field → globals → LVGL.
- LVGL sliders → globals → HEX field → Home Assistant.

Why We Don’t Use light.rgb for Text/Icon Colors ⚪⚫
You might wonder: “Why not just expose text/icon colors as an RGB light (light.rgb) in ESPHome and let Home Assistant handle it?” 🤔
There are a few practical reasons why this setup avoids light.rgb and instead uses plain integers + HEX strings:
- We want true, exact grayscale shades 🧊
For a clean UI, you often want pure gray values like#404040,#666666,#B0B0B0. That means R = G = B exactly.With alight.rgbentity, Home Assistant typically handles color in HSV/HSB space and does conversions back and forth. That conversion plus rounding and gamma may give you something almost gray, but not mathematically exact (for example,#7F7F80instead of#808080). For UI text and icon colors this subtle difference is visible and annoying. - We don’t need color temperature, white balance, or effects 🌈🚫
The usual RGB light model is designed for LED strips and bulbs, with brightness, color temperature, effects, and so on. Here we just need static RGB values to feed into LVGL. Extra features fromlight.rgbadd complexity without giving us anything useful for a 2D UI. - We want full control over storage and rounding 🎯
Storing colors inglobalsas rawintvalues (0–255) means:- We control exactly how values are clamped and rounded.
- HEX is generated consistently (
%02X), so#808080is always#808080. - There is no hidden transformation layer between Home Assistant and the display.
- Simpler mental model 🧠
- HA side: you see two text fields:
#RRGGBBfor text and icons. - Device side: two groups of integers (R, G, B).
- LVGL side: convert to
lv_color_hex(rgb)and draw.
- HA side: you see two text fields:
In short, using text + globals + HEX gives us a predictable, pixel‑perfect color pipeline where grayscale shades are truly gray, and every step is under our control.
Touch Gestures & Page Navigation ✋🧭
The UI has two pages:
main_page– weather + battery + Home Assistant icon.settings_page– brightness + text color + icon color + Back button.
You can switch pages in two ways:
- 👉 Tap on the Home Assistant icon on the main page.
- 👈👉 Use horizontal swipe gestures:
- Swipe left on main page → open settings page.
- Swipe right on settings page → go back to main page.
Swipe Detection Logic 🌀
To implement this, the config uses a set of globals to track the swipe:
globals:
  - id: swipe_start_x
    type: int
  - id: swipe_start_y
    type: int
  - id: swipe_in_progress
    type: bool
  - id: swipe_last_x
    type: int
  - id: swipe_last_y
    type: int
  - id: swipe_locked
    type: bool
The GT911 touchscreen callbacks are used:
on_touch– when a new touch starts, save the starting coordinates.on_update– while finger is moving, calculate distance and detect swipe.on_release– reset flags.
Key part in on_update:
const int SWIPE_THRESHOLD = 80;

if (id(swipe_locked)) {
  return;
}

if (!id(swipe_in_progress)) {
  return;
}

auto t = id(tft_touch).get_touch();
...
int dx = cx - id(swipe_start_x);
int dy = cy - id(swipe_start_y);
int adx = dx >= 0 ? dx : -dx;
int ady = dy >= 0 ? dy : -dy;

if (adx > ady && adx > SWIPE_THRESHOLD) {
  if (dx > 0) {
    // Right swipe → main page
    if (id(is_settings_page_active)) {
      id(show_main_page).execute();
    }
  } else {
    // Left swipe → settings page
    if (!id(is_settings_page_active)) {
      id(show_settings_page).execute();
    }
  }
  id(swipe_in_progress) = false;
}
Important details:
- ↔️ Only horizontal swipes are considered (
adx > ady). - 📏 A minimum distance (80 px) avoids false positives.
- 🔒
swipe_lockedis used whenever a slider is being dragged, so sliders don’t accidentally trigger a page change.
Auto‑Return Timer ⏳
Once the settings page is open, a script ensures it goes back to the main page after 30 seconds of inactivity:
script:
  - id: settings_idle_timer
    mode: restart
    then:
      - delay: 30s
      - lvgl.page.show:
          id: main_page
          animation: MOVE_RIGHT
          time: 200ms
      - lambda: 'id(is_settings_page_active) = false;'
Anything that counts as “activity” (touching sliders, etc.) restarts this timer.
LVGL Layout & Visual Details 🧩🎯
The LVGL configuration is fairly comprehensive:
- 🆎
default_font: montserrat_27and several Montserrat sizes viagfonts://Montserrat. - 🖤 Global
disp_bg_color: 0x000000for a pure black background. - 📄 Two pages:
main_pageandsettings_page.
Main Page Layout 🏠
The main page uses LVGL flex layouts to keep widgets aligned and centered:
temperature_group– top center row with icon + large number + °C.humidity_group– second row, similar layout.pressure_group– bottom left with icon and two labels.battery_group– bottom right with icon, percentage label, and bar.ha_icon_widget– Home Assistant icon at bottom center as a button.
Example:
- obj:
    id: temperature_group
    align: TOP_MID
    y: 0
    layout:
      type: FLEX
      flex_flow: ROW
      flex_align_main: CENTER
      flex_align_cross: CENTER
      pad_column: 10
    widgets:
      - image:
          id: temperature_icon_widget
          src: icon_temperature
          image_recolor: 0xFFFFFF
      - label:
          id: temperature_value
          text: "??"
          text_font: montserrat_120
      - label:
          id: temperature_unit
          text: "°C"
          text_font: montserrat_96
Icons use mdi: images pre‑rendered to rgb565 with alpha transparency, so recoloring is clean and smooth.
Settings Page Layout ⚙️
The settings page is vertically stacked:
- Brightness group – label + percentage + slider.
- Text color group – header with text + HEX + preview, then three rows R/G/B.
- Icon color group – same pattern as text color.
- Back button – a centered button at the bottom.
Scrolling is enabled, and when you open the settings page, the code resets scroll position to the top:
- id: show_settings_page
  then:
    ...
    - lvgl.page.show:
        id: settings_page
        animation: MOVE_LEFT
        time: 200ms
    - lambda: |-
        lv_obj_t *page = id(settings_page)->obj;
        if (page != nullptr) {
          lv_obj_scroll_to_y(page, 0, LV_ANIM_OFF);
          lv_obj_scroll_to_x(page, 0, LV_ANIM_OFF);
        }
This ensures you always start from the top, regardless of where you left it last time.

Initialization & On‑Boot Behavior 🔄🚀
On boot, ESPHome:
- 🔢 Converts the stored RGB globals into HEX strings and writes them into the two text entities (
text_color_hexandicon_color_hex). - 🧱 When LVGL is ready (
lvgl: on_ready), it applies the colors and synchronizes all sliders/labels.
esphome:
  on_boot:
    priority: 600
    then:
      - text.set:
          id: text_color_hex
          value: !lambda |-
            int r = id(text_color_r_glob);
            ...
            char buf[8];
            sprintf(buf, "%02X%02X%02X", r, g, b);
            return std::string(buf);
      - text.set:
          id: icon_color_hex
          value: !lambda |-
            ...

lvgl:
  on_ready:
    then:
      - script.execute: apply_text_color
      - script.execute: update_color_ui
      - script.execute: apply_icon_color
      - script.execute: update_icon_color_ui
This means the device:
- 🔁 Boots with previously stored colors.
- 📤 Immediately updates Home Assistant’s HEX fields to match.
- 🧷 Applies colors to all widgets and aligns sliders/labels to the real state.
Key Takeaways & Ideas to Reuse ✅💡
Here are the main patterns you can reuse in your own ESPHome + LVGL projects:
- Bi‑directional color control (HEX + sliders + globals) 🎨
- HEX text entities for advanced tweaking from HA.
- RGB sliders on the device.
- Globals as the single source of truth.
- Swipe navigation with lock during slider interaction 👆↔️
- Custom swipe detection on top of the GT911 driver.
swipe_lockedflag to avoid accidental page switches while dragging sliders.
- Brightness as a first‑class Home Assistant entity 💡
- Treat the backlight as a
light. - Template sensor to sync UI slider and HA entity.
- Clamping brightness to avoid a completely dark screen.
- Treat the backlight as a
- Auto‑return from settings with inactivity timer ⏲️
- A simple
scriptwithmode: restartto implement “screen saver” behavior.
- A simple
- Predictable grayscale UI instead of
light.rgb⚪⚫- Exact R/G/B integers and HEX strings.
- No HSV/HSB conversion issues.
- Truly neutral grays for a clean UI.
- Consistent LVGL styling 🧩
- Google fonts via
gfonts://. - Centralized color application via scripts (
apply_text_color,apply_icon_color).
- Google fonts via
If you want a compact, always‑on Home Assistant display that you can tweak directly from your sofa 🛋️, this ESP32‑S3 + LVGL + ESPHome setup is a very flexible foundation. You can easily extend it with more pages, more sensors, or even interactive controls (toggles, buttons, etc.) using the same patterns shown here. 🚀GitHub repository
Leave a Reply