In the previous article, DIY a Smart Reverse Osmosis TDS & Flow Meter with ESPHome and ESP32‑C6, the hardware side of a smart RO monitor was built: TDS probes, a flow sensor, and an ESPHome-powered ESP32‑C6 board that exposes all readings to Home Assistant.
The full source code for the Home Assistant card that visualizes these readings is available on GitHub:
- GitHub repository: https://github.com/VahaC/TDS-and-Flow-meter-card
If you use HACS, you can install the card like this:
- Make sure HACS is already installed in your Home Assistant.
- In Home Assistant, go to HACS → Frontend → ⋮ (menu) → Custom repositories.
- Add
https://github.com/VahaC/TDS-and-Flow-meter-cardas a repository and choose category Dashboard. - After adding it, find “TDS & Flow Card” in the HACS Frontend section and click Download / Install.
- When installation is finished, reload your browser and, if needed, restart Home Assistant or reload resources.
- Now you can add a new card in the dashboard and choose TDS & Flow Card (or use
type: custom:tds-flow-cardin YAML).
If you are curious about how this card actually works under the hood, the rest of this post gives a detailed walkthrough of the implementation.
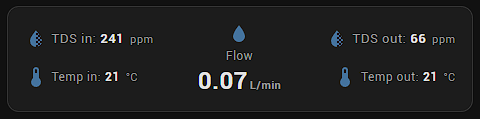
This post focuses on the front‑end side of that project: a custom Lovelace card that presents all those sensors in a compact, readable layout. The code below lives in a single file (for example, TDS-and-Flow-meter-card.js) and registers a new card type:
type: custom:tds-flow-cardThe card is designed specifically for that RO setup:
- TDS in (before the RO membrane)
- TDS out (after the RO membrane)
- Water temperature in/out (to understand how temperature affects readings)
- Flow rate (to monitor usage and diagnostics)
Along the way it adds: per‑sensor icons, customizable labels, and separate tap actions for both icons and values. ⚙️
High-level architecture 🧱
The file implements two LitElement components:
TdsFlowCard– the actual Lovelace card that shows sensor values.TdsFlowCardEditor– the UI editor that appears in the Lovelace card configuration dialog.
At the end of the file, both elements are registered and some metadata is added for the Home Assistant card picker:
if (!customElements.get("tds-flow-card")) {
  customElements.define("tds-flow-card", TdsFlowCard);
}

if (!customElements.get("tds-flow-card-editor")) {
  customElements.define("tds-flow-card-editor", TdsFlowCardEditor);
}

window.customCards = window.customCards || [];
window.customCards.push({
  type: "tds-flow-card",
  name: "TDS & Flow Card",
  description:
    "Shows TDS in/out, temperatures and flow in a compact 3-column layout with per-sensor icons, labels and tap behaviors",
});
The component itself is built on top of [email protected] which is imported directly from a CDN:
import { LitElement, html, css } from "https://unpkg.com/[email protected]/lit-element.js?module";Card layout and styling 🎨
The card uses a CSS grid to arrange the sensors into three logical columns:
- Left: TDS in + Temp in
- Center: Flow
- Right: TDS out + Temp out
This is defined in the .container style:
.container {
  display: grid;
  grid-template-areas:
    "tds-in flow tds-out"
    "temp-in flow temp-out";
  grid-template-columns: 1fr auto 1fr;
  grid-template-rows: auto auto;
  column-gap: 16px;
  row-gap: 4px;
  align-items: center;
}
``;

Each cell is then mapped to a CSS class:

- `.tds-in` → `grid-area: tds-in;`
- `.temp-in` → `grid-area: temp-in;`
- `.flow` → `grid-area: flow;`
- `.tds-out` → `grid-area: tds-out;`
- `.temp-out` → `grid-area: temp-out;`

Text styling is intentionally compact:

- Main values (TDS, flow) use **13–24px** font sizes and bold weights.
- Temperature rows use slightly smaller **12px** font size and secondary text color.
- Units (`ppm`, `°C`, etc.) are rendered in **11px** with a lighter color.

Icons are aligned by using a small `translateY(-1px)` transform to visually center them with the baseline of the text:

```js
.icon,
.icon-flow {
  display: inline-flex;
  align-items: center;
  justify-content: center;
  transform: translateY(-1px);
  cursor: pointer;
  color: var(--paper-item-icon-color, #44739e);
}
This keeps the appearance tight and consistent with the default Home Assistant theme. ✨
Connecting to Home Assistant state 🧠
The card receives two key properties from Home Assistant:
hass– the full Home Assistant object (states, services, helpers)._config– the card configuration object (entities, labels, options).
static get properties() {
  return {
    hass: { attribute: false },
    _config: { attribute: false },
  };
}

setConfig(config) {
  if (!config || typeof config !== "object") {
    throw new Error("Invalid configuration for tds-flow-card");
  }
  this._config = { ...config };
}
To fetch entity states, the card uses a small helper inside render:
const getStateObj = (entityId) =>
  entityId && hass.states[entityId] ? hass.states[entityId] : undefined;

const tdsIn = this._formatValue(getStateObj(c.tds_in_entity), "ppm");
const tempIn = this._formatValue(getStateObj(c.tds_in_temp_entity), "°C");
// ...
Each sensor is turned into a { value, unit } pair by _formatValue.
Value formatting and units 🔢
One of the goals of the card is to respect the formatting configuration of the underlying sensors. Instead of manually rounding numbers, the card uses Home Assistant’s own formatter when available:
_formatValue(stateObj, fallbackUnit) {
  if (!stateObj) {
    return { value: "–", unit: fallbackUnit || "" };
  }

  const state = stateObj.state;
  if (state === "unknown" || state === "unavailable") {
    return { value: "–", unit: fallbackUnit || "" };
  }

  const unit = stateObj.attributes?.unit_of_measurement || fallbackUnit || "";
  let display = state;

  try {
    if (this.hass && typeof this.hass.formatEntityState === "function") {
      display = this.hass.formatEntityState(stateObj);
      if (unit && display.endsWith(unit)) {
        const idx = display.lastIndexOf(unit);
        const valuePart = display.slice(0, idx).trim();
        return { value: valuePart, unit };
      }
      return { value: display, unit: "" };
    }
  } catch (_e) {
    // Fallback below
  }

  const precision = stateObj.attributes?.display_precision;
  const num = Number(state);
  if (typeof precision === "number" && Number.isFinite(num)) {
    return { value: num.toFixed(precision), unit };
  }

  return { value: state, unit };
}
This function:
- Handles missing/
unknown/unavailablestates with a dash (–). - Extracts units from
unit_of_measurementor falls back to a default. - Uses
hass.formatEntityStateif available to match the user’s locale, unit, and precision settings. - If the formatted string ends with the unit (e.g.
"12.3 ppm"), it splits the value and unit for cleaner styling. - Falls back to
display_precisionif the entity provides it.
For the RO setup this means:
- TDS sensors show the same precision as configured in ESPHome/Home Assistant.
- Flow and temperature values keep their natural formatting.
Icon and value tap actions 👆
Each sensor row supports two independent tap behaviors:
- One for the value (main text), e.g. open more-info or navigate.
- One for the icon, e.g. navigate to a diagnostic dashboard.
The core of this feature is the _handleAction method:
_handleAction(ev, actionConfig, entityId) {
  if (ev) {
    ev.stopPropagation();
  }
  if (!this.hass || !entityId) return;

  const config = actionConfig || { action: "more-info" };
  const action = config.action || "more-info";

  switch (action) {
    case "more-info":
      fireEvent(this, "hass-more-info", { entityId });
      break;
    case "navigate":
      if (config.navigation_path) {
        window.history.pushState(null, "", config.navigation_path);
        fireEvent(window, "location-changed");
      }
      break;
    case "url":
      if (config.url_path) {
        window.open(config.url_path);
      }
      break;
    case "call-service":
      if (config.service) {
        const [domain, service] = config.service.split(".");
        this.hass.callService(domain, service, config.data || {});
      }
      break;
    case "toggle":
      this.hass.callService("homeassistant", "toggle", { entity_id: entityId });
      break;
    default:
      break;
  }
}
Supported actions:
more-info– open the standard entity dialog 🔍navigate– go to another Lovelace viewurl– open an external linkcall-service– call any Home Assistant servicetoggle– toggle an entity (not very common for sensors, but available)
In the template, actions are wired like this:
<span
  class="value"
  @click=${(ev) =>
    this._handleAction(ev, c.tds_in_tap_action, c.tds_in_entity)}
>
  ${tdsIn.value}
</span>

<ha-icon
  class="icon"
  .icon=${iconTdsIn}
  @click=${(ev) =>
    this._handleAction(ev, c.tds_in_icon_tap_action, c.tds_in_entity)}
></ha-icon>
This makes it possible, for example, to:
- Tap the TDS in value to show the history graph.
- Tap the TDS in icon to jump to a dedicated RO diagnostics dashboard.
Per-sensor icons and labels 🖼️
Every sensor row has three levels of customization:
- Show/hide icon (
show_icon_*booleans) - Icon name (
mdi:…strings) - Label text (e.g.
"TDS in","Temp out")
Example of how these are derived in render:
// Visibility
const showIconTdsIn = !!c.show_icon_tds_in;
// ...

// Icons with defaults
const iconTdsIn = c.icon_tds_in || "mdi:water-opacity";
const iconTdsInTemp = c.icon_tds_in_temp || "mdi:thermometer";
// ...

// Labels with defaults
const labelTdsIn = c.label_tds_in || "TDS in";
const labelTdsInTemp = c.label_tds_in_temp || "Temp in";
// ...
If a field is not set in the configuration, the card falls back to reasonable defaults. This keeps the initial setup simple, while allowing fine‑grained tweaks for polished dashboards. ✨
Stub configuration for the card picker 🧩
When the card is added from the Lovelace UI, Home Assistant calls getStubConfig to pre‑fill the configuration. The card tries to guess TDS and flow sensors from the existing entities:
static getStubConfig(hass, entities) {
  const all = entities || Object.keys(hass.states || {});
  const sensors = all.filter((e) => e.startsWith("sensor."));

  const findBy = (substring) =>
    sensors.find((e) => e.toLowerCase().includes(substring)) || "";

  return {
    name: "TDS & Flow",
    tds_in_entity: findBy("tds_in") || findBy("tds in"),
    tds_in_temp_entity: findBy("temp_in") || findBy("temperature_in"),
    flow_entity: findBy("flow") || sensors[0] || "",
    tds_out_entity: findBy("tds_out") || findBy("tds out"),
    tds_out_temp_entity:
      findBy("temp_out") || findBy("temperature_out"),
  };
}
This saves a bit of time when wiring everything for the ESPHome RO device described in the previous post.
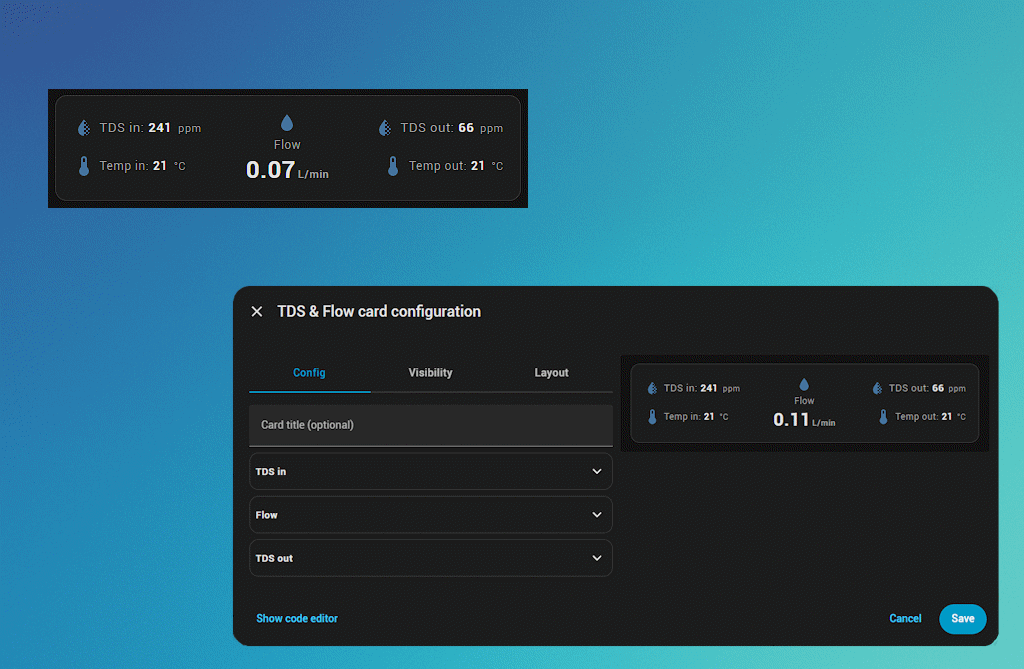
The configuration editor: 3 collapsible groups 🧾
The TdsFlowCardEditor component provides a friendly UI for editing the card. It uses:
ha-expansion-panel– for collapsible groupsha-form– to automatically render form fields based on a schema- Home Assistant’s built‑in
ui_actionselector – for tap behaviors
The editor is structured into three main groups:
- TDS in
- Flow
- TDS out
Each group is a separate expansion panel:
<ha-expansion-panel outlined expanded>
  <div slot="header" class="group-title">TDS in</div>
  <div class="group-body">
    ${this._renderSensorForm(data, this._schemaTdsInMain)}
    <div class="separator"></div>
    ${this._renderSensorForm(data, this._schemaTdsInTemp)}
  </div>
</ha-expansion-panel>

<ha-expansion-panel outlined>
  <div slot="header" class="group-title">Flow</div>
  <div class="group-body">
    ${this._renderSensorForm(data, this._schemaFlow)}
  </div>
</ha-expansion-panel>

<ha-expansion-panel outlined>
  <div slot="header" class="group-title">TDS out</div>
  <div class="group-body">
    ${this._renderSensorForm(data, this._schemaTdsOutMain)}
    <div class="separator"></div>
    ${this._renderSensorForm(data, this._schemaTdsOutTemp)}
  </div>
</ha-expansion-panel>
Each sensor block (like TDS in main, TDS in temp, etc.) is described with a schema:
get _schemaTdsInMain() {
  return [
    { name: "tds_in_entity", selector: { entity: { domain: "sensor" } } },
    { name: "label_tds_in", selector: { text: {} } },
    { name: "show_icon_tds_in", selector: { boolean: {} } },
    { name: "icon_tds_in", selector: { icon: {} } },
    { name: "tds_in_tap_action", selector: { ui_action: {} } },
    { name: "tds_in_icon_tap_action", selector: { ui_action: {} } },
  ];
}
The helper _renderSensorForm arranges these fields in three rows:
- Entity + label
- Show icon toggle + icon selector
- Value tap action + icon tap action
Labels for each field are generated in _computeLabel to keep text user‑friendly, e.g. “TDS in sensor”, “Label for Temp out (optional)”, “Icon tap behavior”, etc.
Every time the user changes something, the editor fires a standard config-changed event:
_valueChanged(ev) {
  if (!this.hass) return;
  const newConfig = ev.detail.value;
  this._config = newConfig;
  fireEvent(this, "config-changed", { config: this._config });
}
Home Assistant then saves the config back to the dashboard.
Example Lovelace configuration 📄
Below is a complete example configuration that matches the device from “DIY a Smart Reverse Osmosis TDS & Flow Meter with ESPHome and ESP32‑C6”. Adjust entity IDs to your own ESPHome sensors:
type: custom:tds-flow-card
name: RO TDS & Flow

# Main entities
tds_in_entity: sensor.ro_tds_in
tds_in_temp_entity: sensor.ro_temp_in
flow_entity: sensor.ro_flow_l_min
tds_out_entity: sensor.ro_tds_out
tds_out_temp_entity: sensor.ro_temp_out

# Labels (optional – defaults are used if omitted)
label_tds_in: TDS in
label_tds_in_temp: Temp in
label_flow: Flow
label_tds_out: TDS out
label_tds_out_temp: Temp out

# Icons and visibility
show_icon_tds_in: true
icon_tds_in: mdi:water-opacity
show_icon_tds_in_temp: true
icon_tds_in_temp: mdi:thermometer
show_icon_flow: true
icon_flow: mdi:water
show_icon_tds_out: true
icon_tds_out: mdi:water-opacity
show_icon_tds_out_temp: true
icon_tds_out_temp: mdi:thermometer

# Tap actions for values
tds_in_tap_action:
  action: more-info

tds_in_temp_tap_action:
  action: more-info

flow_tap_action:
  action: more-info

tds_out_tap_action:
  action: more-info

tds_out_temp_tap_action:
  action: more-info

# Tap actions for icons
flow_icon_tap_action:
  action: navigate
  navigation_path: /lovelace/ro-diagnostics

# Other icon tap actions can stay empty (default = more-info)
If the flow entity is not yet configured, the card shows a small placeholder text:
Select flow entity in editor
This makes it obvious what needs to be wired without breaking the layout.
How this card fits into the overall RO project 🔗
Together with the ESPHome configuration from “DIY a Smart Reverse Osmosis TDS & Flow Meter with ESPHome and ESP32‑C6”, this card provides a complete, polished user experience:
- ESP32‑C6 + ESPHome → reads sensors and exposes them to Home Assistant
tds-flow-card→ presents data in a compact, dashboard‑friendly way
Benefits for day‑to‑day use:
- Quickly see input vs output TDS and catch when filters need replacement.
- Monitor temperature to understand how it influences TDS readings.
- Track flow rate to estimate usage and diagnose flow restrictions.
- Use tap actions to jump into more advanced debug dashboards or call maintenance automations.
Ideas for future improvements 🚀
The current implementation is intentionally focused and opinionated, but it can be extended in multiple ways:
- Localization – add a simple label mapping for multiple languages.
- Dynamic colors – change text color based on TDS thresholds (e.g. green/yellow/red).
- Additional metrics – e.g. cumulative water usage, filter life estimate, or RO efficiency percentage.
- Theme support – use more CSS variables so the card adapts better to custom themes.
Because the card is written in pure LitElement and only relies on standard Home Assistant components, all of these features can be added incrementally.
Conclusion ✅
This custom TDS & Flow card bridges the gap between the hardware project (ESPHome + ESP32‑C6 RO monitor) and a clean, usable UI inside Home Assistant.
By combining:
- A clear 3‑column layout for TDS in/out, temperatures, and flow
- Flexible icons, labels, and tap actions
- A convenient configuration editor with collapsible groups
…it turns a handful of raw sensor entities into a dashboard widget that is both informative and nice to look at. 💙
If you already built the RO device from the previous blog post, dropping this card into your www folder and wiring up your sensors is a natural next step to complete the project.
Leave a Reply