I really like the look of the GeekMagic SmallTv devices. 😍 The problem: the stock firmware is limited, and doesn’t integrate nicely with my smart home.
So I decided to turn my GeekMagic SmallTv S3 into a dedicated dashboard for my outdoor sensor:
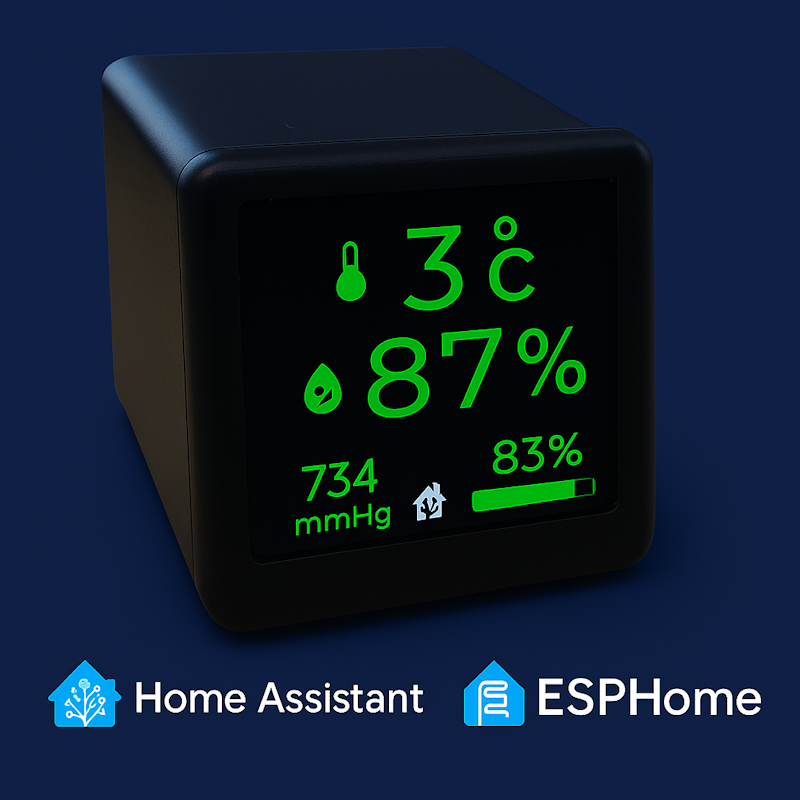
- Big temperature value in the center
- Humidity below it
- Pressure and battery at the bottom
- All data comes from Home Assistant
- Text color and backlight brightness are both controlled from a single light entity in Home Assistant
In this post I’ll show how I wired this up with ESPHome and a custom display lambda.
What this setup does 🔍
Once everything is flashed and connected:
- The device shows:
- Temperature with a large font and thermometer icon
- Humidity with a large font and water icon
- Pressure in mmHg at the bottom left
- Battery level (percentage + bar) at the bottom right
- All values are read from existing Home Assistant entities (in my case, an outdoor weather sensor).
- The Text Color Light on the device:
- Its brightness slider controls the screen backlight.
- Its color picker controls the text + icon color.
- Brightness and color are restored after reboot thanks to ESPHome’s
restore_mode.
The end result: a compact, always-on, ESP32-based weather/status display fully controlled by Home Assistant.
Requirements 📦
You’ll need:
- A GeekMagic SmallTv S3 device with ESP32-S3 inside
- A USB‑C/USB‑A cable to flash the firmware
- Home Assistant with these entities (names can be changed in the config):
sensor.outdoor_sensor_temperaturesensor.outdoor_sensor_humiditysensor.outdoor_pressure_mmhgsensor.outdoor_sensor_battery
- ESPHome (either via the Home Assistant add-on or standalone)
I assume you already know how to get ESPHome talking to your Home Assistant and how to flash a firmware to an ESP32.
ESPHome configuration overview 🧠
The full configuration does a few things:
- Sets up Wi‑Fi, API, OTA and basic debug logging.
- Defines a PWM output on GPIO14 for the IPS display backlight.
- Creates an internal monochrome light
back_lightthat drives the backlight. - Creates a virtual RGB light
Text Colorwhich:- Is visible in Home Assistant
- Controls the color of all UI elements
- Controls backlight brightness via a small
on_stateautomation
- Loads several Montserrat fonts from Google Fonts for different sizes.
- Configures the ST7789 display via
ili9xxxand draws everything in a singlelambda. - Subscribes to 4 Home Assistant sensors and forces a screen redraw whenever values change.
- Exposes a
Current Brightnesssensor which shows the current backlight brightness in %.
Below I’ll walk through the important parts.
Lights: backlight and text color 💡
First I define the PWM output and two ESPHome lights:
output:
  - platform: ledc
    pin: 14
    inverted: True
    id: backlight_pwm
    frequency: 20000 Hz

  # Dummy outputs for RGB "Text Color" light (not physically connected)
  - platform: template
    id: text_color_r
    type: float
    write_action:
      - lambda: |-
          // This output is virtual; no hardware action required.

  - platform: template
    id: text_color_g
    type: float
    write_action:
      - lambda: |-
          // This output is virtual; no hardware action required.

  - platform: template
    id: text_color_b
    type: float
    write_action:
      - lambda: |-
          // This output is virtual; no hardware action required.

light:
  # Backlight (internal), dimmable, state restored between reboots
  - platform: monochromatic
    output: backlight_pwm
    name: "Display Backlight"
    id: back_light
    internal: true
    restore_mode: RESTORE_DEFAULT_ON

  # Virtual RGB light to control text color from Home Assistant
  - platform: rgb
    name: "Text Color"
    id: text_color_light
    red: text_color_r
    green: text_color_g
    blue: text_color_b
    restore_mode: RESTORE_DEFAULT_ON
    on_state:
      - lambda: |-
          // Sync backlight brightness and on/off with "Text Color" light
          auto &vals = id(text_color_light).remote_values;

          if (vals.is_on()) {
            // Turn on backlight with the same brightness
            auto call = id(back_light).turn_on();
            call.set_brightness(vals.get_brightness());  // 0.0 .. 1.0
            call.perform();
          } else {
            // Turn off backlight when "Text Color" is off
            auto call = id(back_light).turn_off();
            call.perform();
          }
      # Redraw display when color/brightness changes
      - component.update: lcd_display
Why this setup?
- Home Assistant gets a nice RGB light called
Text Color. - From the UI you can:
- Change the color → ESPHome uses it for all text and icons.
- Change the brightness → ESPHome mirrors it to the hidden
back_lightand physically dims the screen.
restore_mode: RESTORE_DEFAULT_ONmakes sure brightness/color survive reboots.
Fonts and display configuration ✍️
I’m using Montserrat from Google Fonts in four sizes so that the layout is crisp and readable on a 240×240 display:
font:
  - file: "gfonts://Montserrat"
    id: montserrat_80
    size: 80
    bpp: 4

  - file: "gfonts://Montserrat"
    id: montserrat_48
    size: 48
    bpp: 4

  - file: "gfonts://Montserrat"
    id: montserrat_30
    size: 30
    bpp: 4

  - file: "gfonts://Montserrat"
    id: montserrat_18
    size: 18
    bpp: 4
The display itself is configured with the ili9xxx platform and an ST7789V panel:
display:
  - platform: ili9xxx
    id: lcd_display
    model: st7789v
    spi_id: spihwd
    data_rate: 40MHz
    dc_pin: 7
    reset_pin: 6
    spi_mode: MODE3
    dimensions:
      width: 240
      height: 240
      offset_height: 0
      offset_width: 0
    invert_colors: true
    auto_clear_enabled: false
    update_interval: never

    lambda: |-
      // Background
      it.fill(Color(0x000000));

      // Dynamic text color taken from "Text Color" light
      auto &color_values = id(text_color_light).remote_values;
      float r = color_values.get_red();
      float g = color_values.get_green();
      float b = color_values.get_blue();

      uint8_t r8 = (uint8_t) (r * 255.0f);
      uint8_t g8 = (uint8_t) (g * 255.0f);
      uint8_t b8 = (uint8_t) (b * 255.0f);
      uint32_t text_color_raw = ((uint32_t) r8 << 16) | ((uint32_t) g8 << 8) | (uint32_t) b8;

      Color text_color = Color(text_color_raw);
      Color white = Color(0xFFFFFF);
      Color dim   = Color(0x555555);

      int x1, y1, w, h;

      // Temperature, humidity, pressure and battery drawing code goes here...
Inside the lambda I:
- Convert the RGB light values into a
Colorinstance. - For each sensor:
- Check
has_state(). - Compute text bounds with
get_text_bounds()to center numbers. - Draw the icon, main value and units.
- Check
- For the battery:
- Draw the percentage text at the top right.
- Draw a simple bar filled based on the battery level.
I won’t paste the entire lambda again here since it’s pretty long, but you can copy it from the full config at the end of this article.
Pulling values from Home Assistant 🔗
The device doesn’t have its own sensors – it just subscribes to Home Assistant entities and redraws the screen when they change:
sensor:
  # Temperature (from Home Assistant)
  - platform: homeassistant
    id: temperature
    unit_of_measurement: "°C"
    entity_id: sensor.outdoor_sensor_temperature
    on_value:
      - component.update: lcd_display

  # Humidity (from Home Assistant)
  - platform: homeassistant
    id: humidity
    unit_of_measurement: "%"
    entity_id: sensor.outdoor_sensor_humidity
    on_value:
      - component.update: lcd_display

  # Pressure (from Home Assistant)
  - platform: homeassistant
    id: presure
    unit_of_measurement: "mmHg"
    entity_id: sensor.outdoor_pressure_mmhg
    on_value:
      - component.update: lcd_display

  # Battery level (from Home Assistant)
  - platform: homeassistant
    id: battery
    entity_id: sensor.outdoor_sensor_battery
    unit_of_measurement: "%"
    on_value:
      - component.update: lcd_display

  # Template sensor that exposes current backlight brightness in %
  - platform: template
    id: current_brightness_variable
    name: "Current Brightness"
    unit_of_measurement: "%"
    accuracy_decimals: 0
    state_class: "measurement"
    update_interval: 2s
    filters:
      - delta: 1.0   # publish only if brightness changed by >= 1%
    lambda: |-
      // Light brightness is in range 0.0..1.0, convert to percentage
      return id(back_light).current_values.get_brightness() * 100.0f;
A couple of details:
- I use
on_value: component.update: lcd_displayto redraw the screen only when data actually changes, not on a fixed interval. - The
Current Brightnesssensor is optional but nice to have in the device page in Home Assistant. - The
delta: 1.0filter prevents spamming the logs and the HA database with tiny brightness fluctuations.
How to use it from Home Assistant 🏠
After flashing this ESPHome config and adding the node to Home Assistant, you’ll see:
- A light entity called
Text Color - A sensor called
Current Brightness
From the device page in Home Assistant you can now:
- Use the color picker on
Text Colorto change the color of all text and icons on the screen. - Use the brightness slider to dim or brighten the whole display.
- Turn the
Text Colorlight off to completely turn off the backlight.
Because restore_mode is enabled on both the backlight and the RGB light, the device will remember:
- Whether it was on/off
- What color you picked
- What brightness you left it at
So after a power cut or reboot it comes back exactly as you configured it.
Full ESPHome configuration 🧾
Here is the full configuration I’m currently running on my GeekMagic S3 based display:GitHub repository
esphome:
  name: geekmagic_s3
  friendly_name: GeekMagic S3 Display without LVGL
  name_add_mac_suffix: false
  on_boot:
    then:
      # Only force initial display redraw, do not change light state
      - component.update: lcd_display

esp32:
  board: esp32-s3-devkitm-1
  framework:
    type: arduino

# Enable logging
logger:
  baud_rate: 0
  level: INFO

# Enable web server
web_server:
  version: 3

# Enable Home Assistant API
api:
  encryption:
    key: !secret geekmagic-s3-display-without-lvgl_encryption_key

ota:
  - platform: esphome
    password: !secret geekmagic-s3-display-without-lvgl_ota_password

wifi:
  ssid: !secret wifi_ssid
  password: !secret wifi_password

  # Enable fallback hotspot (captive portal) in case Wi-Fi connection fails
  ap:
    ssid: "Geekmagics3 Fallback Hotspot"
    password: "SnS1zf9rX2i0"

captive_portal:

debug:
  update_interval: 5s

text_sensor:
  - platform: debug
    device:
      name: "Device Info"
    reset_reason:
      name: "Reset Reason"

# Define a PWM output on the ESP32
output:
  - platform: ledc
    pin: 14
    inverted: True
    id: backlight_pwm
    frequency: 20000 Hz

  # Dummy outputs for RGB "Text Color" light (not physically connected)
  - platform: template
    id: text_color_r
    type: float
    write_action:
      - lambda: |-
          // This output is virtual; no hardware action required.

  - platform: template
    id: text_color_g
    type: float
    write_action:
      - lambda: |-
          // This output is virtual; no hardware action required.

  - platform: template
    id: text_color_b
    type: float
    write_action:
      - lambda: |-
          // This output is virtual; no hardware action required.

# Define lights
light:
  # Backlight (internal), dimmable, state restored between reboots
  - platform: monochromatic
    output: backlight_pwm
    name: "Display Backlight"
    id: back_light
    internal: true
    restore_mode: RESTORE_DEFAULT_ON  # restore last state; default ON if no saved state

  # Virtual RGB light to control text color from Home Assistant
  - platform: rgb
    name: "Text Color"
    id: text_color_light
    red: text_color_r
    green: text_color_g
    blue: text_color_b
    restore_mode: RESTORE_DEFAULT_ON  # restore last color/on state
    on_state:
      - lambda: |-
          // Sync backlight brightness and on/off with "Text Color" light
          auto &vals = id(text_color_light).remote_values;

          if (vals.is_on()) {
            // Turn on backlight with the same brightness
            auto call = id(back_light).turn_on();
            call.set_brightness(vals.get_brightness());  // 0.0 .. 1.0
            call.perform();
          } else {
            // Turn off backlight when "Text Color" is off
            auto call = id(back_light).turn_off();
            call.perform();
          }
      # Redraw display when color/brightness changes
      - component.update: lcd_display

spi:
  clk_pin: 12
  mosi_pin: 11
  interface: hardware
  id: spihwd

font:
  - file: "gfonts://Montserrat"
    id: montserrat_80
    size: 80
    bpp: 4

  - file: "gfonts://Montserrat"
    id: montserrat_48
    size: 48
    bpp: 4

  - file: "gfonts://Montserrat"
    id: montserrat_30
    size: 30
    bpp: 4

  - file: "gfonts://Montserrat"
    id: montserrat_18
    size: 18
    bpp: 4

display:
  - platform: ili9xxx
    id: lcd_display
    model: st7789v
    spi_id: spihwd
    data_rate: 40MHz
    dc_pin: 7
    reset_pin: 6
    spi_mode: MODE3
    dimensions:
      width: 240
      height: 240
      offset_height: 0
      offset_width: 0
    invert_colors: true
    auto_clear_enabled: false
    update_interval: never

    lambda: |-
      // Background
      it.fill(Color(0x000000));

      // Dynamic text color taken from virtual RGB light "Text Color"
      // Use remote_values to avoid one-step lag (current_values can still hold previous state here)
      auto &color_values = id(text_color_light).remote_values;

      float r = color_values.get_red();    // 0.0 .. 1.0
      float g = color_values.get_green();  // 0.0 .. 1.0
      float b = color_values.get_blue();   // 0.0 .. 1.0

      // Convert 0.0..1.0 floats to 0xRRGGBB
      uint8_t r8 = (uint8_t) (r * 255.0f);
      uint8_t g8 = (uint8_t) (g * 255.0f);
      uint8_t b8 = (uint8_t) (b * 255.0f);
      uint32_t text_color_raw = ((uint32_t) r8 << 16) | ((uint32_t) g8 << 8) | (uint32_t) b8;

      // If light is off we still keep the last color, but you can dim it if needed
      Color text_color = Color(text_color_raw);
      Color white = Color(0xFFFFFF);
      Color dim   = Color(0x555555);
      int x1, y1, w, h;

      // ---------- TEMPERATURE (icon + big value + °C on the right) ----------
      Color temperature_color = text_color;
      char temperature_buf[8];
      if (id(temperature).has_state()) {
        float t = id(temperature).state;
        snprintf(temperature_buf, sizeof(temperature_buf), "%.0f", t);
      } else {
        temperature_color = dim;
        snprintf(temperature_buf, sizeof(temperature_buf), "??");
      }
      it.get_text_bounds(0, 0, temperature_buf, id(montserrat_80), TextAlign::TOP_LEFT, &x1, &y1, &w, &h);
      int temperature_num_y = 0;
      int temperature_num_x = 120 - w / 2;  // center horizontally

      // Temperature icon on the left
      it.image(temperature_num_x - 48 - 4, temperature_num_y + (h / 2 - 48 / 2), id(icon_temperature), temperature_color);
      // Temperature numeric value
      it.printf(temperature_num_x, temperature_num_y, id(montserrat_80), temperature_color, TextAlign::TOP_LEFT, "%s", temperature_buf);
      // "°" slightly above/right, smaller font
      int temperature_unit_x = temperature_num_x + w + 4 + 8;
      int temperature_unit_y = temperature_num_y + h - 20 - 10;  // tuned vertical offset
      it.printf(temperature_unit_x, temperature_unit_y, id(montserrat_48), temperature_color, TextAlign::BOTTOM_LEFT, "°");
      // "C" slightly below/right, smaller font
      temperature_unit_x = temperature_num_x + w + 4 + 8;
      temperature_unit_y = temperature_num_y + h - 20 + 10;  // tuned vertical offset
      it.printf(temperature_unit_x, temperature_unit_y, id(montserrat_48), temperature_color, TextAlign::BOTTOM_LEFT, "C");

      // ---------- HUMIDITY (icon + big value + % on the right) ----------
      Color humidity_color = text_color;
      char humidity_buf[8];
      if (id(humidity).has_state()) {
        float h_val = id(humidity).state;
        snprintf(humidity_buf, sizeof(humidity_buf), "%.0f", h_val);
      } else {
        humidity_color = dim;
        snprintf(humidity_buf, sizeof(humidity_buf), "??");
      }
      it.get_text_bounds(0, 0, humidity_buf, id(montserrat_80), TextAlign::TOP_LEFT, &x1, &y1, &w, &h);
      int humidity_num_y = 75;
      int humidity_num_x = 120 - w / 2;

      // Humidity icon on the left
      it.image(humidity_num_x - 48 - 4, humidity_num_y + (h / 2 - 48 / 2), id(icon_humidity), humidity_color);
      // Humidity numeric value
      it.printf(humidity_num_x, humidity_num_y, id(montserrat_80), humidity_color, TextAlign::TOP_LEFT, "%s", humidity_buf);
      // "%" on the right
      int humidity_unit_x = humidity_num_x + w + 4 + 8;
      int humidity_unit_y = humidity_num_y + h - 20;
      it.printf(humidity_unit_x, humidity_unit_y, id(montserrat_48), humidity_color, TextAlign::BOTTOM_LEFT, "%%");

      // ---------- HOME ASSISTANT ICON AT THE BOTTOM CENTER ----------
      int ha_size = 35;
      int ha_x = (240 - ha_size) / 2;
      int ha_y = 195;
      it.image(ha_x, ha_y, id(icon_home_assistant), white);

      // ---------- PRESSURE at the bottom left: value above "mmHg" ----------
      Color presure_color = text_color;
      char presure_buf[8];
      if (id(presure).has_state()) {
        float p = id(presure).state;
        snprintf(presure_buf, sizeof(presure_buf), "%.0f", p);
      } else {
        presure_color = dim;
        snprintf(presure_buf, sizeof(presure_buf), "???");
      }
      it.printf(25, 170, id(montserrat_30), presure_color, TextAlign::TOP_LEFT, "%s", presure_buf);
      it.printf(20, 205, id(montserrat_18), presure_color, TextAlign::TOP_LEFT, "mmHg");

      // ---------- BATTERY: percentage at top right + bar below ----------
      float batt = id(battery).has_state() ? id(battery).state : NAN;
      int bar_x = 150;
      int bar_y = 210;
      int bar_w = 80;
      int bar_h = 12;
      Color battery_color = text_color;
      char battery_buf[8];
      if (!isnan(batt)) {
        if (batt < 0) batt = 0;
        if (batt > 100) batt = 100;
        snprintf(battery_buf, sizeof(battery_buf), "%.0f", batt);
        // Filled part of the battery bar
        int fill_w = (int)(bar_w * (batt / 100.0f));
        if (fill_w < 0) fill_w = 0;
        if (fill_w > bar_w) fill_w = bar_w;
        if (fill_w > 2) {
          it.filled_rectangle(bar_x + 1, bar_y + 1, fill_w - 2, bar_h - 2, battery_color);
        }
      } else {
        battery_color = dim;
        snprintf(battery_buf, sizeof(battery_buf), "??");
      }
      // Text "83%" (for example) at the top right (aligned with pressure)
      it.printf(220, 170, id(montserrat_30), battery_color, TextAlign::TOP_RIGHT, "%s%%", battery_buf);
      // Battery bar frame
      it.rectangle(bar_x, bar_y, bar_w, bar_h, battery_color);

image:
  - file: mdi:home-assistant
    id: icon_home_assistant
    resize: 35x35
    type: binary
  - file: mdi:thermometer
    id: icon_temperature
    resize: 48x48
    type: binary
  - file: mdi:water-percent
    id: icon_humidity
    resize: 48x48
    type: binary

sensor:
  # Temperature (from Home Assistant)
  - platform: homeassistant
    id: temperature
    unit_of_measurement: "°C"
    entity_id: sensor.outdoor_sensor_temperature
    on_value:
      - component.update: lcd_display

  # Humidity (from Home Assistant)
  - platform: homeassistant
    id: humidity
    unit_of_measurement: "%"
    entity_id: sensor.outdoor_sensor_humidity
    on_value:
      - component.update: lcd_display

  # Pressure (from Home Assistant)
  - platform: homeassistant
    id: presure
    unit_of_measurement: "mmHg"
    entity_id: sensor.outdoor_pressure_mmhg
    on_value:
      - component.update: lcd_display

  # Battery level (from Home Assistant)
  - platform: homeassistant
    id: battery
    entity_id: sensor.outdoor_sensor_battery
    unit_of_measurement: "%"
    on_value:
      - component.update: lcd_display

  # Template sensor that exposes current backlight brightness in %
  - platform: template
    id: current_brightness_variable
    name: "Current Brightness"
    unit_of_measurement: "%"
    accuracy_decimals: 0
    state_class: "measurement"
    update_interval: 2s
    filters:
      - delta: 1.0   # publish only if brightness changed by >= 1%
    lambda: |-
      // Light brightness is in range 0.0..1.0, convert to percentage
      return id(back_light).current_values.get_brightness() * 100.0f;
If you already have a GeekMagic SmallTv-style device sitting on your desk, this is a nice way to give it a new job 🧑🏭: a clean, always-on status display powered entirely by Home Assistant and ESPHome. 🏡📊
Leave a Reply